Ticketing
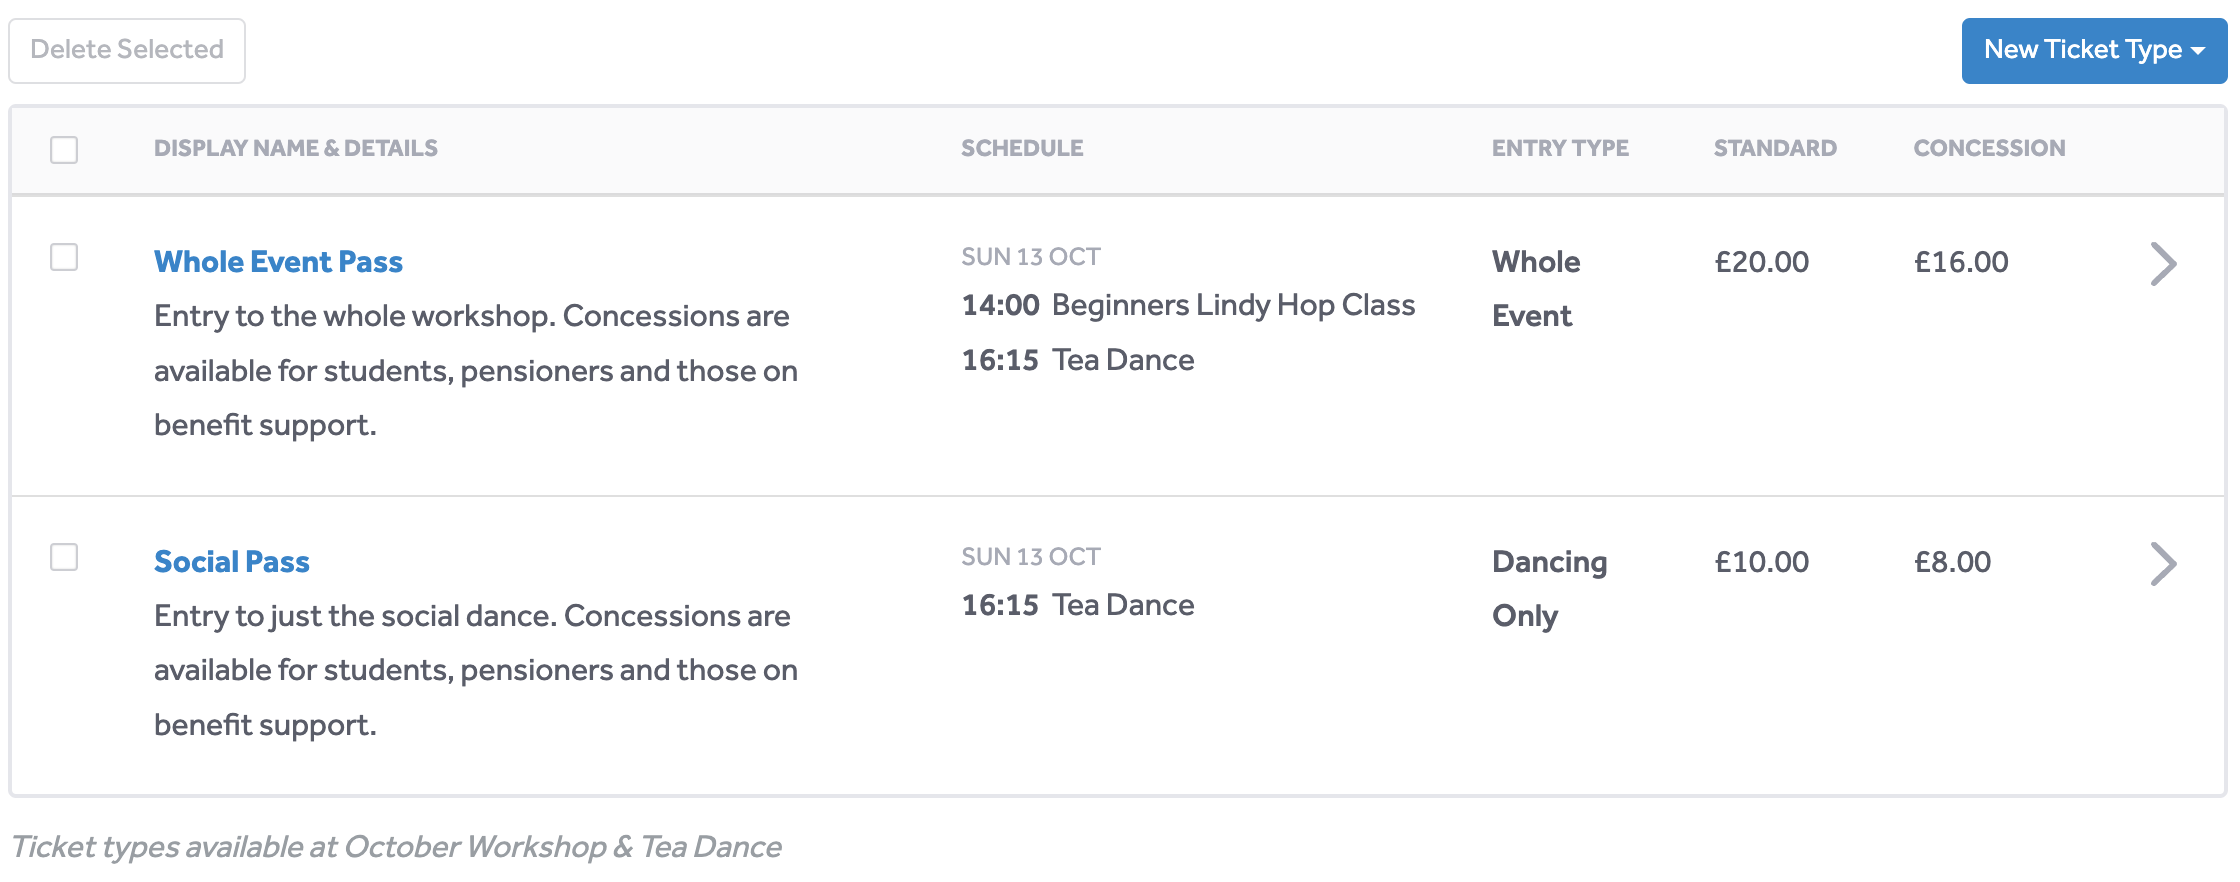
In this chapter, we'll cover creating ticket types at your event. These are the ticketing options that customers can choose from when booking for your event, and they determine how much the customer pays.
Ticketing and the Schedule
In DanceCloud, each ticket type you create determines the activities in the event schedule that the customer is admitted to when they buy a ticket of that type. This allows DanceCloud to manage the capacity and lead/follow balance at each activity.
For example, an event that has a lesson followed by a social dance. When creating ticket types, DanceCloud needs to understand whether the ticket type admits the customer to just the lesson, just the social dance, or both.
TIP
Ensure that you've created all the activities at your event before you start creating ticket types.
Ticket Sales Dates
On the ticketing step, the dates ticket sales open and close are shown above the table that lists ticket types. By default, sales will open as soon as you publish your event - and they will close when the event finishes.
To change this, click the "Change" link next to the description of when sales open and close. You will see a modal where you can set a sales open and/or close date and time.
The dates you enter here apply to all ticket types you create. If you need different dates for a specific ticket type, you can specify these when creating or editing a ticket type.
Creating Ticket Types
Use the blue "New Ticket Type" button to start creating a ticket type.
Ticket Types
If your event has multiple activities in its schedule, you will first need to choose the type of ticket that you want to create. The ticket type determines which activities customers purchasing the ticket will be admitted to.
The available types are:
- Whole Event: admits the customer to every activity at your event.
- Lessons Only: admits the customer to all lessons at your event.
- Dancing Only: admits the customer to all social dances at your event.
- Custom Entry: grants access to specific activities that you choose when creating the ticket type.
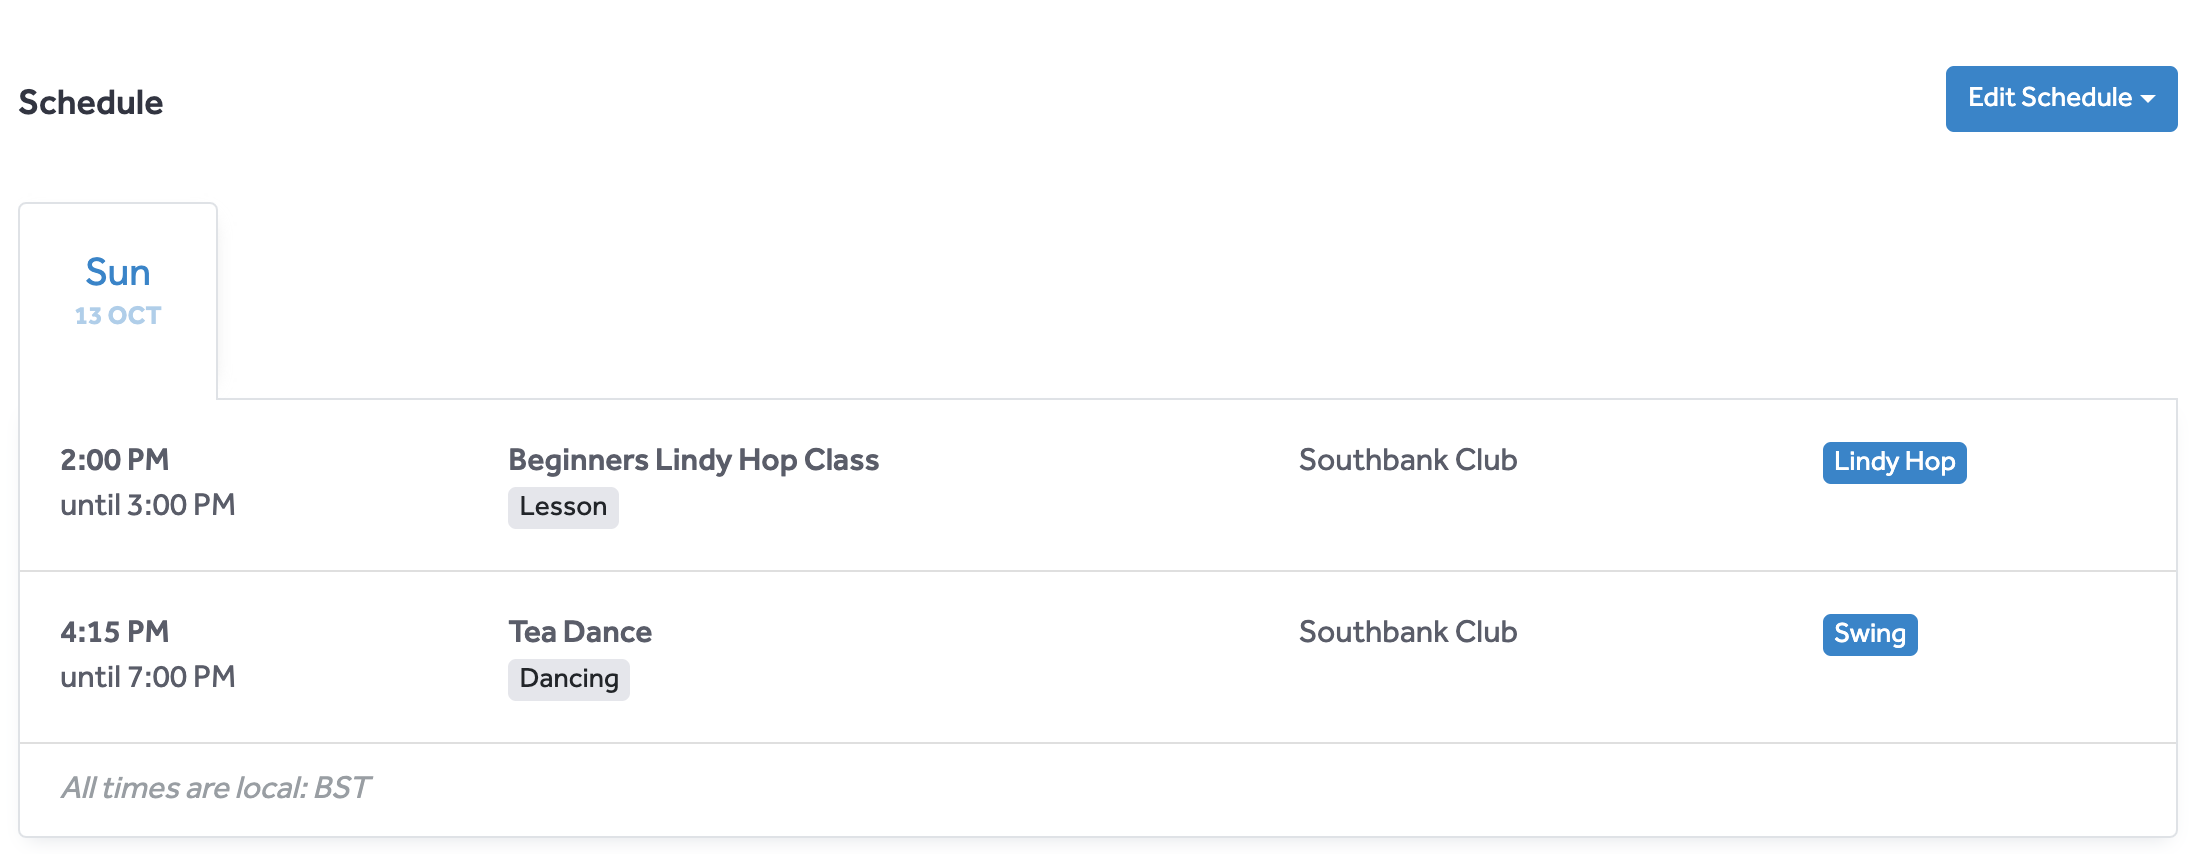
Once you have selected the type, you will be shown a modal. This displays the activities in the schedule that the customer will be admitted to for this ticket type.
If you chose Custom Entry, you will need to select the activities in the schedule that the customer will be admitted to.
TIP
Ensure the schedule is correct for the ticket type you want to create before proceeding.
Display Name & Position
Enter the name for the ticket type that you want to display to customers. For example, Workshop Pass, Social Pass, etc.
You can also specify the position of the ticket type in the list shown to customers by entering a number for the display position. Tickets are sorted in ascending order, so the lowest number will be shown first.
INFO
If multiple ticket types have the same position, they will be sorted alphabetically by their display name.
DanceCloud Fee
Use this toggle to determine whether the ticket fee is included in the price of the ticket, or added on top. When the toggle is enabled, the fee will be added on top.
INFO
For example, given a ticket that costs £20. The fee in this scenario is £1.
If the fee is included in the price, the customer will be charged £20 and the fee will be deducted - meaning you receive £19 per ticket.
If the fee is added to the price, the customer will be charged £21 - meaning you receive £20 once the ticket fee is deducted.
Note that payment processing fees will apply to the whole order, which may contain multiple tickets. There is no way to pass the payment processing fee on to the customer, so it will always be deducted from the payment total.
Pricing
You will need to enter the prices for the ticket in the fields provided. Additionally, you can choose to enable partnered and/or concession prices. Early bird prices can be configured once you've created the ticket type.
Partnered Pricing
Enable this option if you want to offer a discounted price when a lead and follow book the same ticket at the same time. If you toggle this option on, an additional field will appear for the partnered price.
TIP
When entering a partnered price, the price per person. For example, if you entered a partnered price of £15, then the couple will be charged £30 in total.
DanceCloud automatically discounts its ticket fee on partnered tickets.
Concession Pricing
Enable this option if you want to offer a reduced price for customers that are eligible for concession. For example, you may want to give students, pensioners, or members a reduced price.
TIP
When using concession pricing, make sure you enter a description of who is eligible for the concession in the Description field for the ticket type. This will then be shown to customers when booking. You will need to check eligibility when a customer arrives at your event.
Sales Dates
If you would like to open sales for this ticket type on a specific date and time, use the "Open sales" toggle. This will allow you to choose a date and time.
Likewise, if you would like to close sales for this ticket type on a specific date and time, use the "Close sales" toggle.
TIP
If you set these dates, they apply to this specific ticket type. However, if you've set specific sales dates for your event these will still apply to the whole event - including this ticket type.
Sales Limit
To apply a maximum number of tickets of this type that can be sold, toggle the "Limit number of tickets?" option on. This will show an additional form field where you can enter the limit.
WARNING
If you have set capacity limits on activities in your event schedule, these will still apply. DanceCloud will not allow more tickets to be sold than the capacity of the activities the ticket type admits customers to. If you only want to manage capacity using limits on ticket types, set activities to unlimited capacity and apply limits to each ticket type.
Hiding the Ticket
By default, ticket types will appear in the list of tickets shown to customers in your DanceCloud ticket office.
If you would like to hide a ticket from this list - meaning a customer will not be able to choose it - turn the " Available to Purchase" toggle off.
WARNING
If you already have customers on your wait-list who have selected this ticket type, they will still be able to purchase it.
Editing Ticket Types
To edit a ticket type from the list of ticket types, click on either the name of the ticket type or the arrow on the right hand side of the row. This will navigate you to the ticket type page.

Use the blue Edit button to change any of the detail you entered when creating the ticket type.

If you want to change the schedule of the ticket type - i.e. what activities the ticket type admits customers to - scroll to the bottom of the page and use the blue Edit Schedule button.

WARNING
Changing the schedule of a ticket type does not amend any tickets that have already been sold. These existing tickets will continue to admit customers to the activities that were configured at the point in time the customer paid for the ticket.
Early Bird Pricing
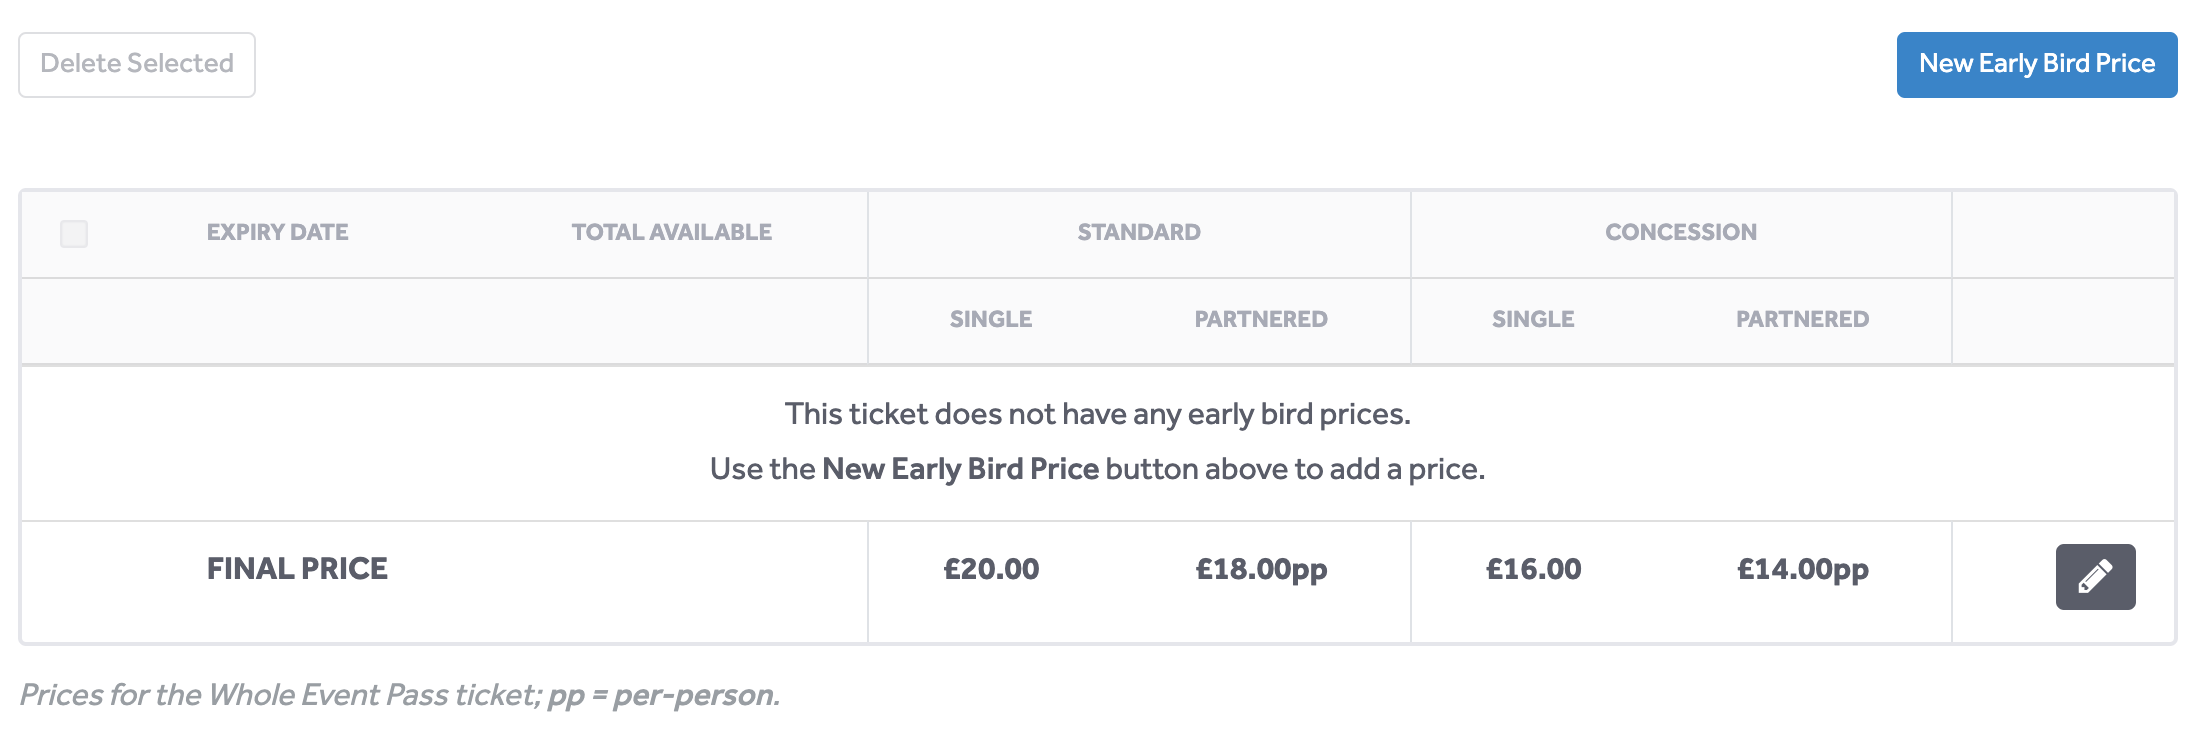
Early bird pricing allows you to set lower prices for your ticket type to incentivise customers to book early. These can be configured in the Pricing section when editing a ticket type.

As shown in the example above, the prices you entered when creating the ticket type are the final (highest) prices. Use the blue New Early Bird Price button to add an early bird price.
When adding an early bird price, it must have either a date on which it expires, or limited availability; or both.
Expiry Date
Use the "Expires on a date" toggle if you want your early bird price to only be available up to a specific date and time. For example, your early bird price might only be available until two months before your event.
Limited Availability
Limit the number of customers that can receive the early bird price by turning the "Limit the availability of this price" toggle on. You'll then need to enter the number of customers that can receive the price. For example, you might want only the first 10 people booking to receive the price.
TIP
The number you enter here is the number of customers - so if a lead and follow are booking a partnered ticket, they will count as 2 customers.
Early Bird Price
Enter the prices that apply. If your ticket type has concession enabled, you will also need to enter a concession price.
If you want to use partnered pricing for this early bird price, turn the "Partnered Pricing" toggle on, then enter the price.
Editing & Deleting Prices
Once created you will see the prices in the table, as shown below.

To edit an early bird price, use the edit button on the right hand side of the row.
To delete early bird prices, use the checkbox on the left to select the row or rows to delete. Then use the Delete Selected button. You'll be prompted to confirm you want to delete the prices.
TIP
Deleting an early bird price does not affect tickets that have already been bought with that price.
Discounts
You can create discount codes after you publish your event. See the Discounts Chapter for more information.
Deleting Ticket Types
To delete ticket types, head back to the list of ticket types at your event.
Select the ticket types you want to delete using the checkbox on the left hand side of the row. Then use the Delete Selected button. You'll be prompted to confirm the deletion.
DANGER
If you delete a ticket type that customers have already purchased, it will not delete the tickets. Instead, these tickets will no longer show the name of the ticket type that was used when they were bought.
We therefore do not recommend deleting ticket types that have already been bought. Instead, hide the ticket type so that customers can no longer purchase it.
What's Next?
In the next step, we'll cover creating optional extras - for example, merchandise.